 SFDMU Help Center
Get Started.
Table of Contents
- Overview
- Step 1. Install the SFDMU
- Step 2. Configure the Migration Job
- Step 3. Run the Migration Job
- Demonstration Video
Overview ⇧
The SFDX Data Move Utility (SFDMU) is a powerful and versatile tool designed to facilitate complex data migration and synchronization processes between Salesforce organizations. As a fully-featured, open-source solution, SFDMU offers significant advantages for Salesforce administrators and developers looking to streamline their data handling practices.
👉 Use the SFDMU GUI Application to easily configure and run the migration jobs.
With this Desktop Application, there’s no need for Notepad and Console. All tasks are performed visually, significantly simplifying migration job management.
Step 1. Install the SFDMU ⇧
Before you install and use the SFDMU Plugin, ensure that the SF CLI is installed on your system.
Use the following commands to manage SFDMU installation:
# Uninstall an old version of the Plugin, if any:
$ sf plugins uninstall sfdmu

# Install the latest version of the Plugin:
$ sf plugins install sfdmu
Notes:
- If you encounter permission issues on MacOS, use the
sudoprefix with the installation command:
$ sudo sf plugins install sfdmu
Step 2. Configure the Migration Job ⇧
Basic Configuration Example: Upserting Accounts ⇧
Create an export.json file like this for basic account upserts:
{
    "objects": [
        {
            "query": "SELECT Id, Name FROM Account",
            "operation": "Upsert",
            "externalId": "Name"
        }
    ]
}
Advanced Configuration Example: Upserting Multiple Related SObjects ⇧
Assume, the data model appears as the following:
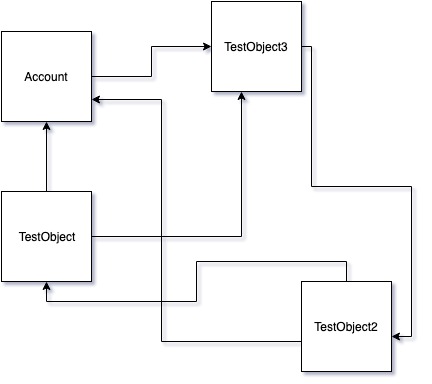
For this data model with complex circular relationships, use a configuration like this to maintain relationships during upserts:
{
    "objects": [
        {
            "query": "SELECT Id, Phone, TestObject3__c FROM Account WHERE Name LIKE 'TEST_ACC_%'",
            "operation": "Upsert",
            "externalId": "Name"
        },
        {
            "query": "SELECT Id, Account__c, TestObject3__c, RecordTypeId FROM TestObject__c",
            "operation": "Upsert",
            "externalId": "Name"
        },
        {
            "query": "SELECT Id, Account__c, TestObject__c FROM TestObject2__c",
            "operation": "Upsert",
            "externalId": "Name"
        },
        {
            "query": "SELECT Id, TestObject2__c FROM TestObject3__c",
            "operation": "Upsert",
            "externalId": "Name"
        }
    ]
}
Important Notes ⇧
- Ensure the correct spelling of object API names in export.json queries as they are case-sensitive.
Step 3. Run the Migration Job ⇧
Navigate to your export.json directory and execute the appropriate command to initiate migration:
- Direct migration between Salesforce orgs:
$ sf sfdmu run --sourceusername source@name.com --targetusername target@name.com
- Import data from CSV files:
$ sf sfdmu run --sourceusername csvfile --targetusername target@name.com
- Export data into CSV files:
$ sf sfdmu run --sourceusername source@name.com --targetusername csvfile
Demonstration Video ⇧
Watch SFDMU in action in this demonstration video.
This demonstration provides all the essential steps and configurations to get started with SFDMU for efficient data migration in Salesforce: